Thursday, October 29, 2015

Halloween Chocolate Espresso Tombstone Shortbread


Who loves a good scare in October? 
I do and all things Halloween of course!
What I love most is that out here in Southern California our weather gradually begins to change as in less heat waves! The ocean breeze blows cooler and dark overcast clouds gradually return, that's our Fall.  But the best news about this is I can finally turn the oven on without over heating the house, and get a little creative in the kitchen!

On a recent trip to the Low Country, I was excited and enchanted when I entered the beautiful Southern Gothic Bonaventure Cemetery just outside Savannah. It's breathtakingly beautiful. 
Paths surrounded with 100 year old live oaks dripping with Spanish moss hanging in long silvery-gray skeins. They reach lengths no less than 10 ft long and when slowly waving in the wind they produce a solemn funeral effect absolutely impressive. 
It's a place that has captured the imagination of many writers, photographers and filmmakers. This 100 acre cemetery is historically significant as a reflection of changing views on death and dying in the Victorian era. As death became more romanticized and ritualized during this period, cemeteries became lush, beautiful "cities of the dead."

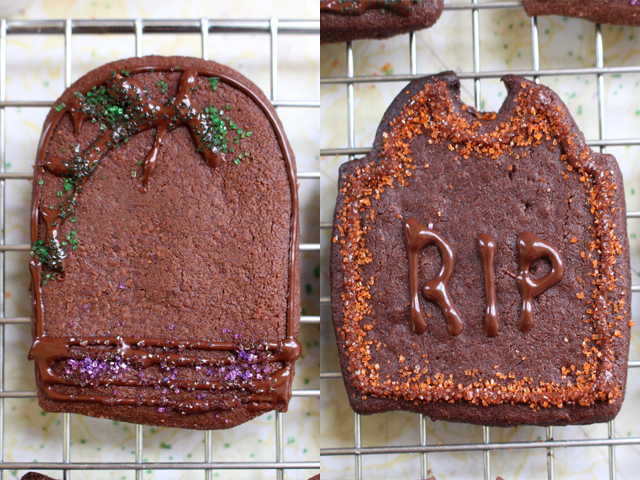
My tombstone chocolate-espresso shortbread cookies are dead ringers for this Halloween season. Their deep, dark flavor with a hint of espresso and cinnamon offer both a warm and bold taste. And, although they may lack in beauty compared to the 'the real ones' their taste is hauntingly exquisite and unforgettable!
Let's bake...shall we?
INGREDIENTS
1-1/2 cup all purpose flour
3/4 cup unsweetened cocoa powder
1/4 tsp salt
1tbsp plus 1 tsp instant espresso powder
1/2 tsp cinnamon
1-1/2 sticks unsalted butter at room temperature
1 cup granulated sugar
1 large egg
1-1/2 tsp vanilla extract
1/2 cup bittersweet chocolate chips
Sugar sprinkles of your choice
TOOLS
Gravestone shaped cookie cutter
2 baking sheets
2 wire cooling racks
Sifter
Rolling pin
Parchment paper
Mixer with paddle attachment
Measuring cups & spoons

#3 piping tip
piping bag or parchment paper
DIRECTIONS
Sift together flour, cocoa butter, salt, cinnamon and espresso into a bowl and set aside.
In stand mixer bowl fitted with paddle attachment beat together butter and sugar until light and fluffy. Add egg and vanilla. Beat until well combined, about 1 minute. Add the dry ingredients and  mix until the dough comes together.
If the dough is soft wrap it tightly in plastic wrap for about 1 hour. (Dough will keep wrapped in plastic, for up to 1 week in the refrigerator or 3 months in freezer.) Otherwise, roll out the dough to 1/2" thick on a lightly floured surface and press the cookie cutter against the dough.  To make the additional feature on the tombstone I pressed the 1/4" teaspoon to cut the shape out. 
Place them 2" apart on a parchment-lined baking sheet. 
Preheat oven to 350˚ F. Bake for about 13 minutes. Remove shortbread to a wire rack to cool.
To pipe the shortbread with chocolate: 
Pour the chocolate chips into a small microwaveable cup and heat in 20 sec intervals until the chocolate chips are melted. Let the chocolate cool down and pour it into the piping bag with the #3 tip.  
Pipe the chocolate along the edge of each cookie and create your own designs, decorate with sprinkles of your choice. The shortbread can be stored in an airtight container for up to 2 weeks.
Makes about 2 dozen 2.5"x2.5" gravestones.
Happy Halloween y'all!


Wednesday, July 1, 2015

Red, White and Cool!


4th of July fireworks will be here very soon and every Summer we have a BBQ and enjoy our country's much celebrated Independence day with friends and family. When night falls we walk down the street and anxiously wait for the city's grand firework display. 

I love hosting gatherings and making our cottage home cozy and fun for everyone! I pull out the once-a-year red, white and blue tablecloths and all things American. It's fun and a great way to kick off the Summer season. It's a weekend with more bike rides and less commuting!
To beat the heat I thought I would surprise everyone with some American flag inspired popsicles in addition to the good ol' apple pie Mom brings! No food dyes here! Just fresh organic fruit and lots of patience! Give yourself 1-2 days to make these.
TOOLS
popsicle mold - I got mine at amazon.com
10 popsicle sticks
1 small bowl or measuring cup with spout for pouring
2 plastic containers w/ lid
small food processor or blender or bullet juicer
whisk
measuring cup & spoons
wax paper
INGREDIENTS

"RED"
1 cup of fresh raspberries
a spash of water
 
"WHITE"
8 oz coconut milk
1/2 cup low fat milk
1/2 cup half & half
1/2 tsp vanilla extract
1/2 tsp coconut extract
1 tbsp sugar
1/4 cup unsweetened shredded coconut

"BLUE"
1 cup of blueberries
a splash of water
DIRECTIONS
In a blender or food processor puree the blueberries until smooth. Place puree in a small bowl with spout.

Wash the blender and repeat the process with the raspberries. This time place the raspberry puree in a plastic container with lid.
 For the "white" coconut mixture, in a mixing bowl add coconut milk, low fat milk, half & half, vanilla extract, coconut extract, sugar and shredded coconut. Mix and whisk. Place mix in a plastic container with lid.

To begin the popsicle design pour the blueberry puree into the bottom of each popciscle mold, about an inch high. In case you get the sides 'dirty' with puree scrape down the sides of each mold with a popsicle stick to keep the popsicle looking 'clean'. Add the popsicle sticks and mold lid. Make sure the sticks are centered so that you can remove the cover for the next layer. Freeze for at least 1 hour, until fully firm.

In the meantime chill the coconut and raspberry containers in the fridge while you are waiting for the blueberry layer to freeze.
When the blueberry mixture is frozen, remove the mold lid and add a thin coconut layer. Place the popsicle mold in the freezer until the coconut layer is frozen.
Another hour...
Next add a thin raspberry layer and freeze for 1 hour. Repeat this step again with coconut and raspberry until you get your desired stripes! This could take a whole day or weekend depending on your time and patience!
Once the popsicle mold is completely solid frozen, carefully unmold your pops. Remove the lid. You may need to slightly dip your mold into warm water to loosen up the popsicles, make sure to not get water into them. Submerge for about 5 seconds in the warm water and pull the pops out. If you want to save a few immediately wrap each popsicle in wax paper and place in a plastic container in the freezer to serve later.
Or enjoy one now cause you worked hard for it!
Happy 4th!

Tuesday, March 17, 2015

Mean Green Pistachio Almond Pound Cake!

Here's an easy pound cake to bake for St Patrick's Day, especially as it falls on a weeknight! 
This pound cake is one of my favorite not-made-from-scratch combinations because you add a pudding mix to a cake box mix which creates a nice firm slightly dense cake you'd expect from a pound cake.  No crumbs here!

Replace the cake box and pudding flavor with any other flavor of your choice. This recipe is a pistachio almond pound cake with green food coloring in honor of St Patricks Day or the Feast of St. Patricks!

TOOLS
your favorite bundt mold, I used the Heritage mold, amazon.com
baking spray
standing mixer
rubber spatula
cooling rack
a few toothpicks

INGREDIENTS
1 pkg yellow cake mix, I used Duncan Hines
1 pkg 3.4 oz Jell-o instant pistachio pudding and pie filling
4 large eggs
1 cup water
1/3 cup canola oil
1 tsp almond extract
A few drops of green food coloring

GLAZE
1 cup of Duncan Hines vanilla frosting
few drops of green food coloing
green and white sugar sprinkles

DIRECTIONS
Preheat oven to 350˚F and place oven rack in the middle. 
Gently spray the oil into the bundt mold, make sure all the corners are coated.

Combine eggs, water and oil in the standing mixer and begin mixing on low speed. Add almond extract. Once all ingredients are combined add a few drops of green food coloring to your desired shade of green. Slowly add the pudding and cake mix until everything is mixed in, and almost all the lumps are smoothed out. About 2 minutes.
Pour into the prepared bundt cake mold. Bake for 45-55 minutes or until toothpick inserted into the center comes out clean. Cool pan for 20 minutes. Once cooled invert over a cooling rack to let cool completely.

Glaze: Place vanilla frosting in small microwaveable bowl and heat for 10 seconds. Stir until smooth and add a few drops of green food coloring to make glaze as green as you like. Drizzle over cake and sprinkle with green and white sugar sprinkles!

Green cake and beer - YUM!

Happy St. Patrick's Day!


Wednesday, February 11, 2015

Eat Your Heart Out Red Velvet!

Bake a Red Velvet heart cake for your Valentine's!

This year I made my life easy and bought a beautiful heart shaped Nordic Ware Bundt cake mold for my Valentine's Day cake. The focus is on a great tasting recipe where you can omit the frosting if you are out time or ingredients!  
Food historians may differ about the origins of Red Velvet cake, many believe the name comes from the naturally reddish hue from the cocoa powder, which is enhanced by a chemical reaction between vinegar and baking soda. Today most versions rely on red food coloring (some bakers use beet juice) to achieve it's vivid shade.
 
So bake that special someone this fab cake, there's still time!
TOOLS
baking spray
standing mixer
heart shape bundt cake - I found mine on Amazon.com
rubber spatula
cooling rack
toothpick
small- medium size strainer
pastry brush
INGREDIENTS
2-1/2 cake flour (not self rising) sifted
2 tbsp unsweetened Dutch-process cocoa powder
1 tsp salt
1-1/2 cup sugar
1-1/2 cup vegetable oil
2 large eggs room temperature
1/2 tsp gel red food coloring
1 tsp vanilla extract
1 cup buttermilk
1-1/2 tsp baking soda
2 tsp distilled white vinegar
DIRECTIONS
Preheat oven to 350 degrees. Prepare bundt cake pan with a good spray coat of baking oil. Use the pastry brush to get into every crevice, nook and cranny. 
 Whisk together cake flour, cocoa and salt.
With an electric mixer on medium-high speed, whisk together sugar and oil until combined. Add eggs one at a time, beating until each is incorporated, scraping down sides of bowl as needed. Mix in food color and vanilla.
Reduce speed to low. Add flour mixture in three batches, alternating with two additions of buttermilk, and whisking well after each. Stir together the baking soda and vinegar in a small bowl (it will foam); add mixture to the batter and mix on medium speed for 10 seconds. 
Pour batter into the hear shaped bundt pan making sure the batter is spread evenly, use the rubber spatula to achieve this. This will help the cake bake up the sides of the pan a bit instead of puffing up in the middle, which doesn't help when you invert it.
Bake for about 45 minutes until toothpick inserted in center comes out clean.
Let cake cool for a while in the bundt cake pan before removing it.  If the cake is too hot, it's more likely to come apart when you invert the pan over the cooling rack or serving plate. Let it cool and set before you disturb it. About 20 minutes. 

Serve with your favorite sparkling wine!
Happy Valentine's Day!


Saturday, February 7, 2015

BE MINE, Madeleine!

 Rosewater Madeleines
Madeleines are little cake-like cookies that are baked in special shell shaped molds. These elegant French tea cakes to bake and share are traditionally from the Lorraine region in Northeastern France. Madeleines date back to the court of Louis XV and the name was give to the cookies by 'Louie' himself to honor his father-in-law's cook Madeleine Paulmier. Louis' wife, Marie introduced them to the court and soon they became the rage at Versailles...and the rest is history.
Aside from the traditional small shell moulded pan, commonly found in specialty kitchen stores or amazon.com, no special tools are required to make madeleines.
A genoise cake batter is used. The flavor is similar to, but somewhat lighter than, sponge cake. Traditional recipes include very finely ground nuts, usually almonds. A variation uses lemon zest, for a lemony flavor, but the ones I made here to celebrate Valentine's use a couple of teaspoons of rosewater and a small drop of red food coloring for the rosy pink. 

In addition to the traditional shell mold I used a cast iron mini heart shape mold that I recently found with my other love, Amazon.com which never disappoints! 
This recipe comes from a book called Madeleines by Barbara Feldman Morse. So many wonderful recipes to try I thought I would start with this one!

TOOLS
Madeleine pan - amazon.com or local kitchen specialty store
Heart shaped baking pan or cast iron - amazon.com
Standing mixer
Rubber spatula
Small offset spatula
Wire rack
INGREDIENTS
1-1/2 tbsp unsalted butter, room temperature
1 cup granulated sugar
2 eggs, room temperature
2 tsp rosewater
1/2 tsp vanilla
1 or 2 drops of red food coloring
1 cup all purpose flour
Baking spray
Sugar crystals - optional

Place rack in the center of oven and preheat oven to 350°.
Coat 2 heart-shaped or madeleine pans with baking spray.
Place butter and sugar in a small sauce pan and melt over low heat on the stove. Stir to make sure butter is fully melted. Let cool. Combine eggs and the sugar/butter mixture in a standing mixer with the paddle attachment and mix until thick and foamy. Add rosewater and vanilla extract plus 1-2 drops of red food coloring and continue mixing. 
Add flour and whisk in gently until just incorporated.
Using a 1-1/2 inch diameter scoop or a teaspoon, fill the molds with batter until almost full. Optional: sprinkle sugar crystals on top of each cake. Bake for 11-13 minutes, until the heart-shaped madeleines puff up and spring back when lightly pressed.
Remove pans from oven and let cool on a wire rack for 2-3 minutes, then invert and tap madeleines onto rack. You may also use a small offset spatula to remove each one individually. Bakes about 2 dozen.
Share these sweet little things with the special people in your life. Take them to work for your co-workers (if you like them!) or wrap them up in a basket, add some teabags and surprise the little ol' lady next door! Whoever you choose to share these with will bring a warm smile to their faces and your heart!


XOXO


Monday, January 26, 2015

Rainy Day Brown Butter Cookies with Sea Salt


Is there ever too much of a good thing? 
As in too much rain when overcoming a drought?  Nope!  Sunny Southern California became wet, slippery and miserable this past weekend and instead of trying to get from point A to B, I opted to forego errands and stayed indoors to test a new 'copy-cat' recipe from a bakery called Brown Butter Cookie Company. This bakery is located in the central coast of California in the small seaside town called Cayucos. Nothing like a rainy weekend to keep you indoors and inspire one to bake!       
Before & After!
 This recipe has been on my radar: brown butter cookies with sea salt. 
The taste is more than a bit of heaven, each bite cloud-like, very airy and so aromatic with amazing nuttiness! The butter makes them delicate and very soft.
The butter is browned until you see those lovely small brown bits and slightly burnt milk fat! 
 TOOLS
1 − 2 qrt saucepan
measuring spoons and cups
mixing bowl
standing mixer with paddle attachment
rubber spatula
parchment paper
2 cookie trays
small cookie dough scoop
2 cooling racks
INGREDIENTS
1-1/2 sticks unsalted butter
1/2 cup packed light brown sugar
1 tsp vanilla extract
1-1/2 cup all purpose flour
1 tsp baking soda
 fleur de sel sea salt for sprinkling
DIRECTIONS
Melt butter in the sauce pan over medium-low heat, swirling, keep a close eye on it. The butter will begin to foam, then clarify before your eyes turning into a beautiful carmel rich brown color with the most amazing nutty aroma. 
This is what you want. 
Turn off the stove and pour the browned butter into a heat proof container and chill in the refrigerator for about 1-2 hrs.  It must be cooled to work on the next steps or your dough will be too soft.
Pour brown butter into a medium bowl and stir in brown sugar and vanilla. In a small bowl whisk together flour and baking soda an add mixture to the wet ingredients. Mix on medium low till all ingredients form the consistency of dough.
Preheat oven to 325°.
Line cookie sheets with parchment paper.
 Form small ball shapes with the cookie scooper and place on cookie sheet. Sprinkle with sea salt.
Bake for 15 minutes or until the cookies are lightly golden. 
Don't over bake or they may get very dry and crumbly. 
Makes about 2 dozen round cookies. 

So go ahead and give this recipe a try as it only requires a few basic ingredients I'm sure you'll have in your pantry. I promise you won't have to run to the grocery store in this wet weather!!!
Stay dry!